General Software Questions
[-] Why do you employ the HASP software protection device on all your software packages?Try updating to the latest HASP drivers.
First, uninstall the old drivers using the application wizard found in the Windows control panel. To quickly access this wizard, press Windows Key+R on your keyboard and then type appwiz.cpl and hit Enter.
The latest HASP drivers can be found here. Download the Sentinel HASP/LDK Windows GUI Run-time Installer (Sentinel_LDK_Run-time_setup.zip) and then run the installer (HASPUserSetup.exe) contained in the zip.
The MWL120 detector features an internal x-ray shutter, usually this is a secondary or redundant shutter. The Auxullary Connector give you the ability to wire the internal shutter to be activated externally of the x-ray enclosure.
The internal shutter can also be overwritten using the Auxullary Connector by jumping pins 1 and 5 together using a male D- 9 pin connector. A switch or jumper need to be connecter to the Auxillary Connector as the internal shutter is normally closed.
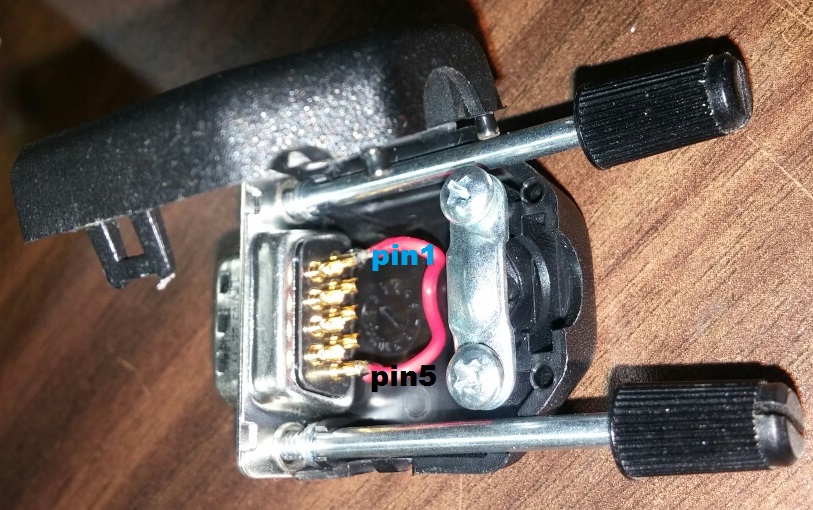
Note that when an external switch is used, the shutter button on the detector front panel must still be pressed in for the shutter to open.
MWL110-Specific Questions
[-] Why can't I provide my own real-time computer?The real-time computer is custom built for the acquisition speed and features necessary to the MWL110 system. We carefully select the motherboard, CPU, and other components to meet these requirements.
Also present in the computer is a custom PCI card designed to interface with the detector electronics and feed the real-time data (tens of thousands of bytes per second) to NorthStar.
It also serves to note that the computer is only one part of the MWL110 system. Specifically, the computer is the user interface to a complicated chain of electronics dedicated to providing rapid crystal orientation.
NorthStar Problems / Comments
[-] "Interface Card is not Installed.." message for Win95 systemsA program called RECONFG executes upon installation, informing the software that the interface is installed (as well as supplying some other information). Should the PARAM.SYS file be accidentally lost, NorthStar will need to be reconfigured.
To do this, navigate (from DOS) to NorthStar's home directory and run RECONFG. Enter the proper DMA channel and interrupt for your system, then try starting NorthStar. For information on how the card is configured, consult your user manual (likely page 47).
- Re-check the angle file to ensure that the correct a, b, c, Alpha, Beta, Gamma values were used for the sample's crystal system.
- It may be possible that one of the points selected is outside of the range of indices within the angle table. Try another point instead or create a new angle table with a specific focus (on the sample in question and its axis).
- Verify that the Specimen Distance is correct.
- Set the ErrBar value to 1.5 degrees (too wide means too many potential solutions to evaluate in the time allotted, too narrow means only a small range of possible solutions are going to be evaluated).
- Recheck the COG (normally 7 pixels) and Epsilon values (normally 5.5, a fitting parameter).
Increasing this number beyond 1500 has not helped the indexing of images as we have carefully researched in the past. The bottom line: it doesn't help, it just wastes time. (Obviously, we can change a variable to make it larger, but we have found that it is not a useful approach.) The root of the problem is that the number of entries are growing geometrically as the number of entries.
A few examples will help you to see this:
2 planes; 1 set of angles; the angle between planes 1-2
3 planes; 3 sets of angles: 1-2, 1-3, 2-3
4 planes; 6 sets of angles: 1-2, 1-3, 1-4, 2-3, 2-4; 3-4
5 planes; 10 sets of angles: 1-2, 1-3, 1-4, 1-5, 2-3, 2-4, 2-5; 3-4, 3-5, 4-5
by extension
6 planes; sets of angles=sum(5+4+3+2+1)=15
7 planes; sets of angles=sum(6+5+4+3+2+1)=21
8 planes; by induction, one can see the progression can be summed as n*(n-1)/2 or for n=8, sum=8*7/2=28
so far the number of entries are small and the software runs fast!
But just try large numbers. For very large n, the number of entries is 0.5*n**2! The number of entries is growing as the number of planes squared!
For the intermediate numbers we use, let's calculate this with Matlab:
For 2 planes, you get 1 entries
For 3 planes, you get 3 entries
For 4 planes, you get 6 entries
For 5 planes, you get 10 entries
For 6 planes, you get 15 entries
For 7 planes, you get 21 entries
For 8 planes, you get 28 entries
For 9 planes, you get 36 entries
For 10 planes, you get 45 entries
For 11 planes, you get 55 entries
For 12 planes, you get 66 entries
For 13 planes, you get 78 entries
For 14 planes, you get 91 entries
For 15 planes, you get 105 entries
For 16 planes, you get 120 entries
For 17 planes, you get 136 entries
For 18 planes, you get 153 entries
For 19 planes, you get 171 entries
For 20 planes, you get 190 entries
For 21 planes, you get 210 entries
For 22 planes, you get 231 entries
For 23 planes, you get 253 entries
For 24 planes, you get 276 entries
For 25 planes, you get 300 entries
For 26 planes, you get 325 entries
For 27 planes, you get 351 entries
For 28 planes, you get 378 entries
For 29 planes, you get 406 entries
For 30 planes, you get 435 entries
For 31 planes, you get 465 entries
For 32 planes, you get 496 entries
For 33 planes, you get 528 entries
For 34 planes, you get 561 entries
For 35 planes, you get 595 entries
For 36 planes, you get 630 entries
For 37 planes, you get 666 entries
For 38 planes, you get 703 entries
For 39 planes, you get 741 entries
For 40 planes, you get 780 entries
For 41 planes, you get 820 entries
For 42 planes, you get 861 entries
For 43 planes, you get 903 entries
For 44 planes, you get 946 entries
For 45 planes, you get 990 entries
For 46 planes, you get 1035 entries
For 47 planes, you get 1081 entries
For 48 planes, you get 1128 entries
For 49 planes, you get 1176 entries
For 50 planes, you get 1225 entries
For 51 planes, you get 1275 entries
For 52 planes, you get 1326 entries
For 53 planes, you get 1378 entries
For 54 planes, you get 1431 entries
For 55 planes, you get 1485 entries
For 56 planes, you get 1540 entries
For 57 planes, you get 1596 entries
For 58 planes, you get 1653 entries
For 59 planes, you get 1711 entries
For 60 planes, you get 1770 entries
For 61 planes, you get 1830 entries
For 62 planes, you get 1891 entries
For 63 planes, you get 1953 entries
For 64 planes, you get 2016 entries
For 65 planes, you get 2080 entries
For 66 planes, you get 2145 entries
For 67 planes, you get 2211 entries
For 68 planes, you get 2278 entries
For 69 planes, you get 2346 entries
For 70 planes, you get 2415 entries
For 71 planes, you get 2485 entries
For 72 planes, you get 2556 entries
For 73 planes, you get 2628 entries
For 74 planes, you get 2701 entries
For 75 planes, you get 2775 entries
For 76 planes, you get 2850 entries
For 77 planes, you get 2926 entries
For 78 planes, you get 3003 entries
For 79 planes, you get 3081 entries
For 80 planes, you get 3160 entries
For 81 planes, you get 3240 entries
For 82 planes, you get 3321 entries
For 83 planes, you get 3403 entries
For 84 planes, you get 3486 entries
For 85 planes, you get 3570 entries
For 86 planes, you get 3655 entries
For 87 planes, you get 3741 entries
For 88 planes, you get 3828 entries
For 89 planes, you get 3916 entries
For 90 planes, you get 4005 entries
For 91 planes, you get 4095 entries
For 92 planes, you get 4186 entries
For 93 planes, you get 4278 entries
For 94 planes, you get 4371 entries
For 95 planes, you get 4465 entries
For 96 planes, you get 4560 entries
For 97 planes, you get 4656 entries
For 98 planes, you get 4753 entries
For 99 planes, you get 4851 entries
For 100 planes, you get 4950 entries
Above was generated using a short Matlab program:
                    fid=fopen('test.txt', 'w');

                    for i=2:100

                    planes=i*(i-1)/2;

                    fprintf('For  %d planes, you get  %d entries\n', i, planes);

                    end

                    fclose(fid);
Thus you can see we can presently "do" up to 55 planes. Anyway, this is a longwinded answer to a brief question!
Yes! NorthStar histograms are saved in a raw data format, but they can be viewed, edited, and exported to many common image types using ImageJ.
Follow these steps:
1. Download and Install ImageJ
The most current version of ImageJ can be found here: http://rsbweb.nih.gov/ij/download.html
2. Launch ImageJ and Import the Histogram File
In ImageJ, click "File->Import->Raw…". A set of options will appear.
For 256x256 histogram images (files roughly 130KB in size), select the following options:
- Image type: 16-bit Unsigned
- Width: 256 pixels
- Height 256 pixels
- Offset to first image: 0 bytes
- Number of images: 1
- Gap between images: 0 bytes
- Check: White is zero
- Check: Little-endian byte order
- Uncheck: Open all files in folder
- Uncheck: Use virtual stack
For 512x512 histogram images (files roughly 518KB in size), select the following options:
- Image type: 16-bit Unsigned
- Width: 512 pixels
- Height 512 pixels
- Offset to first image: 0 bytes
- Number of images: 1
- Gap between images: 0 bytes
- Check: White is zero
- Check: Little-endian byte order
- Uncheck: Open all files in folder
- Uncheck: Use virtual stack
Click OK to continue.
3. Adjust the Image
Click "Image->Adjust->Brightness/Contrast…" and adjust the contrast and brightness of the image to your liking. Other Adjustments can be made at this time as well.
ImageJ will display the histogram image mirrored and rotated. This is because it interprets the data differently than NorthStar. To restore the correct orientation, follow these steps:
- Click "Image->Transform->Rotate 90 degrees Left"
- Click "Image->Transform-> Flip Horizontally"
4. Save the Image to a File Format of your Choice
Click "File->Save As->" and select a format. Enter a file name, select a location, and then click "Save".
To close ImageJ, choose "File->Quit".
For Windows 3.1 and Windows 95 histograms from NorthStar 3.2 (.his) use the following Matlab code:
                    %image_his.m

                    %quick code by db to read Win95 histogram and display with color or  grey  scale

                    ;%  put in filename

                    clear %clears variables out

                    fid=fopen('215zzzz.his','r'); %open histogram filename '215zzz.his' for reading binary file with read permission

                    a=fread(fid, [256,256],'uint8'); %read in 256x256 array with unsigned 8bit integers

                    image(a); colormap(jet); %create image of matix a in color using 'jet' color map

                    axis image; %make square pixels for plotting

                    colorbar

                    pause

                    image(a);colormap(gray); %now make B&W version!

                    axis image; % make square pixels for plotting

                    colorbar

                    pause

                    a_bar=255-a; %invert all the bits to make a negative image

                    clim=[190, 255]; %top 65 pixels contains the data

                    imagesc(a_bar, clim);colormap(gray); %now negative B&W version!

                    axis image; %make square pixels for plotting

                    colorbar
For Windows 2000, Windows XP, and Windows 7 histograms from NorthStar 4.0 and up (.hs2), use the following Matlab code:
                    %image10_his.m

                    %quick code to read Win2k histogram and display with color scale

                    %just change filename and rerun the .m file! Information in topics that follow image data are ignored

                    clear  %clears variables out

                    str=char('Fe7000.hs2'); %put name of histogram here

                    fid=fopen(str,'r') %open histogram filename of det 215o for reading  binary file with read permission

                    b=fread(fid, [256,256],'uint16'); %read in 256x256 array with unsigned 8bit integers

                    for i=1:256


                        for j=1:256


                        a(257-i,j)=b(i,j);


                        end %otherwise the image is reversed!


                    end

                    clf %clear out old image

                    imagesc(a); colormap(jet); %create image of matix a in color using 'jet' color map

                    axis image; % make square pixels for plotting

                    colorbar
 2023 Multiwire Laboratories, Ltd., 95 Brown Rd MS-1018, 266A Langmuir Bldg., Ithaca NY 14850, USA